Category Archives: recipes

Tomato management

Summer rolls on, and the tomatoes keep coming. We’ve done a pretty good job of managing the volume, having made an adjustment to a greater number of large tomato and fewer cherry tomato plants in the garden this year. It’s a major reason why we keep a journal, so we can improve upon each year based on previous years’ learned lessons. Having recently finished putting up our frozen tomatoes for soup and cooking, we moved onto one of our favorite condiments: barbeque sauce.

A couple of years ago J became interested in making homemade BBQ sauce from our tomatoes. We have no complaints with store-bought, but the problem with large gardens and good growing years is that production often outstrips consumption, even when being generous with the neighbors – and we’ve found absolutely no one who eats the same quantity of vegetables we do. Our sauce recipe was a bit of trial and error (this one is version number six of what we’ve tried) but it’s quickly become our favorite.

Cocktail Farmers Best BBQ Sauce

  • 6 lbs tomatoes
  • 2 cups chopped onion
  • 4 garlic cloves
  • 1 jalapeno (or other pepper with a kick)
  • 2 cups cider vinegar
  • 1 cup packed brown sugar
  • 1/2 cup molasses
  • 1 Tbs crushed pepper (black or red, depending on taste preference)
  • 1 Tbs dry mustard
  • 1 Tbs Kosher salt
  • 1 Tbs smoked paprika

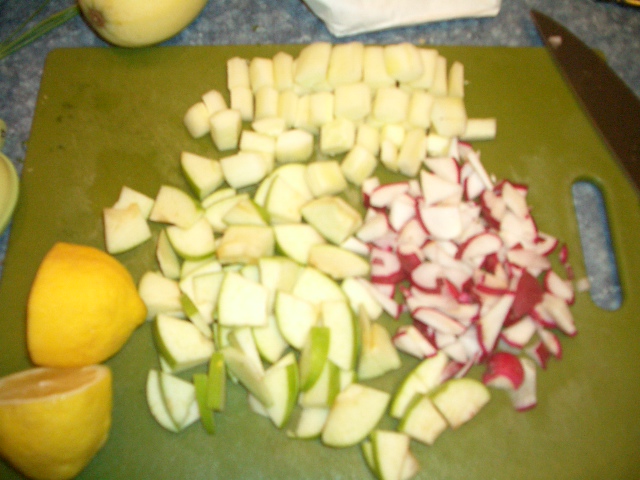
Smoke tomatoes, onion, and garlic on a smoker or charcoal grill for 1-2 hours, depending on the volume of vegetables.
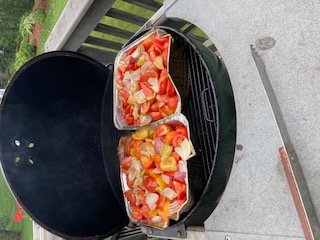
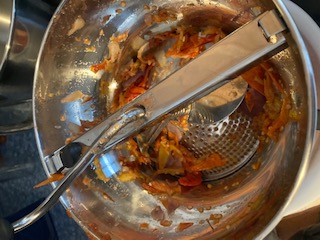
Remove from heat, allow to cool slightly, and then mill with a fine screen:

In process

Add spices to the tomato puree and boil until reduced by half.

That is an automatic pot stirrer – like that one coworker we all have, but significantly more helpful.

We made a double recipe over the weekend – we smoked twelve pounds of tomatoes + onion, milled and cooled it, and parked it in the fridge for the evening, then finished the sauce and canned it yesterday. All told, it took about 8 1/2 hours which I realize sounds slightly insane, but so are we. The reduction time for the sauce is really where the hours came in – it was almost 5 to get it down to the righ consistency, but we started with 2x the volume for this recipe, so it should be shorter if you go strictly by what I’ve written above.

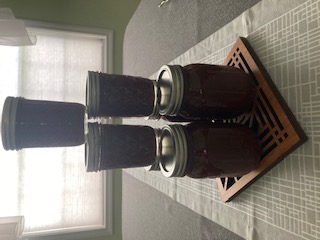
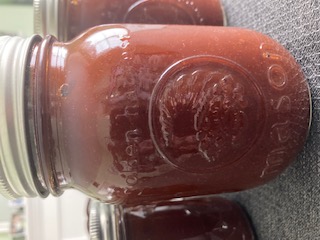
Twelve pounds of tomatoes made 4 16 oz jars and 3 8 oz jars:

My house has smelled amazing for two days, and I can’t wait to do a brisket in a few weeks.

November Harvest

I never would have believed I could be harvesting vegetables in early November.  I did a lot of gardening with my grandfather when I was young (or should I say, my grandfather did a lot of gardening and I futzed around, screeched at the sight of tomato worms, and occasionally helped weed) and all my memories of gardening have the season ending in late September or early October.  But we almost exclusively grew warm weather crops (cucumbers, squash, tomatoes, peppers, pumpkins) that die off with the first frost.

Not so much with the root vegetables.  I must say, I like the plant-’em-and-forget-’em aspect of putting seeds in the ground and walking away.  I put the carrots and parsnips (first year for those) in the ground in April and have been watching the greens grow merrily all summer.  I was particularly excited when the greens got big enough to crowd out weeds in the bed, meaning no more weeding.  The French Breakfast radishes were a second crop in that same bed, planted after the potatoes were harvested and the soil amended. 

This past Sunday I decided to do a crock pot roast with root vegetables.  The recipe called for turnips and rutabegas, but I substituted parsnips.  This is what I picked out of the frosty ground early Sunday morning:

Very impressive.  Of course, when you cut off the greens, it’s not quite so overwhelming:

And you’re left with an entire basket of greenery for the compost bin:

I am pleased to say the pot roast was a hit, too.  Right in line with the do-it-and-forget-it aspect of the vegetables that went into it.  I also used a few of the potatoes I harvested from our garden back in August. 
The recipe is by Robin Miller, courtesy of Foodnetwork.com:

Ingredients

  • 1 onion, chopped
  • 4 small red potatoes, quartered
  • 2 carrots, peeled and chopped
  • 1 turnip, peeled and chopped
  • 1 rutabaga, peeled and chopped
  • 1 (3-pound) chuck roast
  • Salt and ground black pepper
  • 3 tablespoons all-purpose flour
  • 1 (15-ounce) can tomato sauce
  • 2/3 cup brown sugar
  • 2 teaspoons chili powder
  • 1 teaspoon ground cumin
  • 1 teaspoon mustard powder
  • 1 teaspoon garlic powder

Directions

Arrange onion, potatoes, carrots, turnip, and rutabaga in bottom of slow cooker. Season beef all over with salt and black pepper. Rub flour all over beef. (I skipped this step out of sheer laziness.)  Place roast on top of vegetables in slow cooker.  Whisk together tomato sauce, brown sugar, chili powder, cumin, mustard powder, and garlic powder. Pour mixture over beef. Cover and cook on LOW for 12 hours or on HIGH for 8 hours.  Serve 1/3 of beef and all of the vegetables with this meal. Shred and refrigerate remaining beef until ready to use.

It does amount to a hill of beans

“More grows in the garden than the gardener sows.”…Old Spanish Proverb

This was spectacularly true for our bean crop this year.  Last year we got about 2 meals’ worth of beans out of the garden.  Admittedly, we did not plant a lot of plants – maybe 30?  This year, with the addition of the back-40 field, I put in a lot of beans (and peas) in the main garden and out back.  How good could they really do?  Perhaps we’d get 4 meals’ worth, if we were lucky.  What’s that old saying?  Man plans, God laughs?  Exactly.

We’re growing both green bush beans and Royalty Purple Pod Beans.  We’ve eaten some for dinner a couple of times, given a lot away, and then this past weekend, when we returned from vacation, we picked all this:

Which I estimated was approximately 10 pounds of beans.  We gave away three equal quantities to our neighbors, and kept one for ourselves.  Our other neighbors, who also garden and are also buried in beans, made vague suggestions about doing a joint canning operation this week.  We shall see.  But just in case we don’t, and for some reason your CSA has buried you in beans, here are two great recipes for beans I really enjoy. 

Italian Green Bean Salad
by Kathy Kittell of Lenexa, KS – courtesy of Healthy Cooking June/July 2008

1 1/2 lbs fresh green beans, trimmed
1/2 cup fresh basil leaves, thinly sliced
1/2 cup thinly sliced roasted sweet red peppers
1 tbs pine nuts, toasted
2 tbs + 1 1/2 tsp olive oil
1 tbs lemon juice
1/4 tsp garlic powder
1/4 tsp pepper
1/8 tsp salt (I always omit this)
Additional fresh basil leaves, optional

Place beans in a large saucepan and cover with water.  Bring to a boil.  Cook, uncovered for 8 – 10 minutes or until crisp-tender.  Drain & immediately place in ice water.  Drain & pat dry.

Transfer to a salad bowl; add the basil, peppers and pine nuts.  In a small bowl, whisk the oil, lemon juice, garlic powder, pepper & salt (if using.)  Drizzle over bean mixture and toss to coat.  Garnish with additional basil if desired.

And here’s the recipe I made last night:  It’s a grilled green bean recipe, but I put everything into a microwave steamer bag and cook it for about 5 -6 minutes.  I wish I could figure out a way to keep the beans from turning green when they cook, because I think this would be a fabulous splash of color on the table if I could get them to stay purple.

Asian Grilled Green Beans
by Trisha Kruse of Eagle, ID – courtesy of Healthy Cooking (year unknown)

1 tbs brown sugar
1 tbs sesame oil
1 tbs reduced-sodium soy sauce
2 garlic cloves, minced
1/2 tsp crushed red pepper flakes
1 1/2 pounds fresh green beans, trimmed
1 medium red onion, halved & thinly sliced
6 medium fresh mushrooms, quartered

In a large bowl, combine the first firve ingredients.  Add the beans, onion & mushrooms; toss to coat.  Place half the vegetables on a double thickness of heavy-duty foil (about 18″ square); fold foil around vegetables and seal tightly.  Repeat with remaining vegetables.

Grill, covered over medium heat for 18-22 minutes or until beans are tender, turning packets over once.  Open foil carefully to allow steam to escape.

(Or put everything into a microwave steamer bag for 5-6 minutes – much easier.)

Perhaps fewer bean plants next year.  Perhaps.

Squashes and Herbs

Yesterday I made Herbed Summer Squash using a fresh summer squash, zucchini, thyme and parsley from our garden. 

I am always in search of new recipes – I search the Food Network website often (and have found two great recipes in two days this past week from there) and I also subscribe to Every Day with Rachael Ray, Cooking Light, Food & Wine and my mother in law gives me a gift subscription to Vegetarian Times, which is then gifted to Stella Caroline who has a policy of cooking vegetarian at least once a week.  (Admirable; I use the recipes for ideas for sides.)

I love the magazines because Food & Wine and Every Day with Rachael Ray often have great suggestions for kitchen gadgets and other gift ideas that I think are perfect for the cooks in my life.  I’m not the only cook in my household; J has quickly become a grilling expert.  He’s very partial to the show on PBS called Barbeque University with Steve Raichlen.  The show has given us Bourbon Brined Pork ChopsBourbon & Apricot Pork (the recipe calls for ham but we substituted) and Tennessee Pork Loin, the latter prompting J to ask if we had a good pepper mill.  We didn’t, so he made do with what we had.  The recipe was fantastic.  Good thing, because he’ll be asked to make it again.  If only he had the right tools….

Fast forward to today – I am flipping through the August issue of Food & Wine where NYC chef Nick Anderer cites this pepper mill as kitchen gear worthy of a splurge.  Since I like to encourage J to cook (and keep the heat out of my kitchen in summer), I went over to the website and ordered one for him.  The company is based on Nantucket, which seems both odd and fascinating to me as I always think of the island as being purely a tourist destination, but obviously it must have some other industries.  One of which is making pepper mills. 

Further along in that F & W issue is an article about Sauvignon Blancs, which caught my attention for two reasons – 1.) Sauvignon Blanc is my favorite type of white wine; 2.) the author, Ray Isle, writes, “….But Sauvignon Blanc has always been a love-hate proposition, much like cilantro or beets.”  Hee.  Read the article if you don’t believe me.  It’s been established already that I like cilantro, the jury’s out on beets (although I’m leaning favorably towards radishes, so who knows) and I love Sauvignon Blanc – in fact, I would recommend it with any of the above-mentioned pork recipes.  Or anything, really.

Radishes

Fourth of July has come and gone, and with it my first attempt to make something with the radishes.
I made the Delectable Radish Dip as directed by The Hungry Hippo.  She was right, it was delectable.  I stole a page from Stella Caroline and put the radishes in my food processor.  I think she has a much better food processor than I do, with multiple blades that chop vegetables better than mine does, but I will say pitching whole radishes into a mini food processor and pressing “high” makes a terrifically fun racket.
There were more radishes ready this weekend, so I went online to the Food Network website to see what I could find, and found a recipe by Rachael Ray called Red Radish Salad that we liked even better than the DRD from The Hippo.  (Sorry Hippo.) 

Ingredients

  • 2 teaspoons sugar
  • 1 lemon, juiced
  • 1/2 cup sour cream
  • 8 red radishes, thinly sliced
  • 2 Delicious apples, quartered cored and thinly sliced
  • 1/2 European seedless cucmber, thinly sliced
  • 2 tablespoons chopped fresh dill
  • Salt and black pepper

Directions

Combine sugar, lemon juice & sour cream in a medium bowl with a fork. Add radishes, apple, and cucumber.  Turn vegetables and fruit in dressing to coat. Season with dill, salt, and pepper, toss again; serve.
I know a lot of people don’t like Rachael Ray but I’ve been a subscriber to her magazine for a couple of years and I really like her because she uses prepared ingredients in a lot of her recipes which is totally necessary when you want to make dinner on a weeknight and you don’t get home until almost 7 PM.  Anyway, we really liked the salad.  I made a substitution by using Granny Smith apples instead of Delicious apples, based on some of the comments from people who had made the salad.  I will definitely make this again.
I also chopped up the cucumber, apples and radishes more than she suggests, just to make sure that we didn’t end up with a forkful of radish for a bite.
Our very first summer squash has been picked, and will be used in tonight’s dinner.  J suggested I look for a recipe that involved both radishes and summer squash but I don’t think those are two items that have been very popular combinations.

Oh, and do you see that small red thing at the front of the photo?  That would be a strawberry.  Yes, really.  I got one the chipmunk missed.  I brought it in, washed it off and decided I would eat it after dinner.  It tasted terrible.  Really and truly terrible.  I can’t even describe the flavor.  So maybe the chipmunk is doing me a favor?

Speaking of someone who isn’t doing me any favors, here he is napping in my purple bush beans.  Literally on one of the plants:

I know, you’ve missed him.  He’s still around, and still napping.
He came into the main garden with me to “help” me weed.  Despite having about 15 pounds of cat on top of them, the beans are doing really well, and flowering like crazy.  Soon I’ll be hunting up bean recipes.  Stay tuned.

First Harvest of the Season!

……and it’s not anything I’ll be sharing with Stella Caroline.  Sunday night we picked our first crop of cilantro.

(She hates cilantro and claims it tastes like soap.  I say this might be her only failing, the hatred of cilantro.)  This was the very first year we ever had any success growing it; I have been told it is difficult to grow from seed and the last two years that has certainly been true for us. 

The crop we picked was started indoors and transplanted into the herb bed in early May.  I’ve done this in the past with lousy results and was expecting the same result this year.  It looked anemic and wilted but it was in and that was that, in my mind.  I had sort of forgotten about it, to be honest.  And then on Friday J sent me and email that he’d been out looking at the gardens that morning before work and the cilantro was bolting, so we needed to use it soon.

Say what? 

I was convinced he had somehow confused the cilantro with parsley, but no – it was really and truly bolting and about to go to seed, rendering it considerably less tasty.  Since I want to be able to continually harvest cilantro all season and didn’t want to cut every stalk in the garden, I did a little internet research at lunch on Friday and came up with a great article from Sunset magazine which instructs growers to cut off a little bit from the plants to keep the leaves growing continuously.  So I sent J to go out and cut some while I changed out of my gardening clothes before making dinner. While I was upstairs he started chopping the cilantro and I could smell it on the second floor.  I know for a fact that we’ve never had cilantro that fresh before, because I’ve never successfully grown it, and it’s impossible to know how long it’s been at the supermarket.

Now, what to make?  I settled on Thai Style Black Bean Salad, courtesy of Taste of Home magazine, which is a must-have cooking magazine at my house.  Their light recipes are almost always phenomenal.  Anyway, the salad:

Thai-Style Black Bean Salad:

·  1 cup frozen corn
·  15 oz can of black beans, rinsed & drained
·  1 small onion, chopped
·  1 celery rib, thinly sliced
·  1 small sweet red pepper, chopped
·  1/4 cup minced fresh cilantro (or, you know, skip this if it tastes like soap)
·  1 jalapeno pepper, seeded & finely chopped (or cheat & use a 4-oz can of chopped green chilis)
·  2 tablespoons sesame oil
·  1 tablespoon rice vinegar
·  1 tablespoon lime juice
·  2 garlic cloves, minced
·  1 teaspoon minced fresh gingerroot
·  1/2 teaspoon salt (I always skip this ingredient)

Cook corn according to package directions. Transfer to a small bowl; add the beans, onion, celery, red pepper, cilantro and jalapeno.

In a small bowl, whisk the oil, vinegar, lime juice, garlic, ginger and salt. Pour over bean mixture and toss to coat. Cover and refrigerate for at least 1 hour. Yield: 4 servings.

I love this recipe because I almost always have all the ingredients in my fridge and pantry.  I cheat by using a small can of chopped green chilis and I never refrigerate the salad for an hour before serving – I mix and serve immediately.  It does taste better if you refrigerate it first, but I’m always in a rush with dinner in the summer, especially after gardening.  And it makes a nice company dish, too.  Unless you’re inviting Stella Caroline.